en-GBtranslation file is not available, then WebMaker will seek to process file
en). If no translation files are present at all, then WebMaker will use the original language used during development. To use translations, the first step is to create a web application based on one of the languages you need to support. This should ideally be the most commonly used language. Then add language and locale specific XML translation files for each language. You can apply translations to elements, including labels, captions, tool-tips, drop-down list options, etc. The translation files, which we also refer to as dictionary files, are written in XML. An example is shown in the listing below:
<translations xmlns="http://www.hyfinity.com/translate" language_code="en" direction="ltr">
	<global>
		<translation_item id="username" action="replace">
		    <part type="label" value="translated username label"/>
		</translation_item>
	</global>
	<page id="NewForm">
		<translation_item id="title" action="replace">
			 <part type="label" value="translated title label"/>
			 <part type="field_tip" value="Translated field tip"/>
			 <part type="custom_attribute" data_value="currency" value="EUR" />
		</translation_item>
		<translation_item id="submit_button" action="replace">
			<part type="caption" value="translated caption"/>
		</translation_item>
		<translation_item id="output_field" action="replace">
			<part type="caption" value="translated output value"/>
		</translation_item>
		<translation_item id="radio_1" action="replace" >
		    <part type="label" value="This is a question?" />
			<part type="select_option" data_value="Y" value="Yes" />
			<part type="select_option" data_value="N" value="No" />
		</translation_item>
		<translation_item id="select_box" action="replace">
			<part type="select_option" dynamic_value="Value1" value="Translated Value1"/>
			<part type="select_option" dynamic_value="Value2" value="Translated Value2"/>
		</translation_item>
		<translation_item id="date_2" action="replace">
			<part type="date_format" dynamic_value="MM/dd/yyyy" value="dd-MM-yyyy" />
		</translation_item>
		<translation_item id="tab_control" action="replace">
			<part type="select_option" data_value="tab1" value="Translated Tab 1" />
			<part type="select_option" data_value="tab2" value="Translated Tab 2" />
		</translation_item>
		<translation_item id="show_hide_details" action="replace">
			<part type="caption" value="translated Section Details"/>
			<part type="custom_attribute" data_value="showLabel" value="translated Show"/>
			<part type="custom_attribute" data_value="hideLabel" value="translated Hide"/>
		</translation_item>
		<translation_item id="accordion_pane2" action="replace">
			<part type="custom_attribute" data_value="title" value="translated Pane 2" />
		</translation_item>
		<translation_item id="paragraph_1" action="replace">
			<part type="paragraph">
		        <p>Replacing some paragraph text including HTML embedded content.</p>
		    </part>
		</translation_item>
	</page>
</translations>
The root element of the translations file is translations, which has two attributes, the language_code and the direction. The direction attribute can be ltr (Left-To-Right) or rtl (Right-To-Left). The default is ltr and rtl is used for languages such as Arabic. The global section defines translations to be used throughout the application, applicable to all pages. This is followed by a number of page sections, one for each page that contains elements requiring translations. Each translatable field is identified by a translation_item element, whose id attribute must match the field or group name as defined in the WebMaker Studio. For each field, a number of options can be translated if required, by specifying part tags. As shown in the example above, the type attribute indicates what kind of string is being translated (the field's label for example) and the value attribute contains the translated string to use. To translate a set of radio buttons or select box options, set the type attribute to select_option and the data_value attribute to identify the data value the translation applies to. You can then specify your translation for this part in the value attribute. For example:
For English:
 <part type="select_option" data_value="G" value="Green"/>
 <part type="select_option" data_value="B" value="Blue"/>

For Russian:
 <part type="select_option" data_value="G" value="зеленый"/>
 <part type="select_option" data_value="B" value="синий"/>
You need to create one dictionary file for each language you wish to support in your application. The files need to be named in the format dictionary_[language code].xml. For example, to support English, French and Spanish, you would need the following three dictionary files: dictionary_en.xml, dictionary_fr.xml, and dictionary_es.xml. If you are using locale values then the filenames would be dictionary_[language code]-[locale].xml. For example, English-British would be: dictionary_en-GB.xml Table : List of items that can be translated, where you can locate them in the WebMaker Studio, and the XML definitions that should be used.
| Control Attributes on the Properties Panel | Part Type | Translation Details |
| Label | label | <part type="label" value="translated title label"/> |
| Data Constraints - Options(Enumerations). Applies to Radio, MultiCheckbox, Select Box (DropDown List) | select_option |
<part type="select_option" data_value="Y" value="Yes" />
Note: You need one part for each option that needs to be translated. You can use either the data_value or dynamic_value attribute as appropriate to indicate which entry to translate. If data_value is used this will be compared to the underlying value in the data, whereas dynamic_value will be compared to the string that would otherwise be displayed. These map to the DataValue and Display Text options shown on the General Properties tab for the control. |
| Accessibility Options - Field Tip (Generally applicable for almost all Controls) | field_tip | <part type="field_tip" value="Translated field tip"/> |
| Custom Attributes (Generally applicable for almost all Controls) | custom_attribute |
<part type="custom_attribute" data_value="title" value="translated Pane 2" />
Note: The data_value is the name of the custom_attribute. There can be multiple custom_attributes. |
| Button and Anchor Controls - Caption | caption | <part type="caption" value="translated submit button"/> |
| Display Only Control | caption |
<part type="caption" value="translated output value"/>
If your output field can display a dynamic set of values (e.g. status values), then add the dynamic_value attribute. E.g. <part type="caption" dynamic_value="Active" value="Active Translation"/> <part type="caption" dynamic_value="Complete" value="Complete Translation"/> |
| Currency Amount | custom_attribute | <part type="custom_attribute" data_value="currency" value="EUR" /> |
| Value Conversions - Dates - Display format | date_format |
<part type="date_format" dynamic_value="MM/dd/yyyy" value="dd-MMyyyy" />
Note: The dynamic_value relates to the base forms Display Date format. The value is the required format for the language. |
| Tabs - Tab control field | select_option |
<part type="select_option" data_value="tab2" value="Translated Tab 2" />
Notes: Tabs use the Data Constraints for the definition of the Tab names. |
| Accordion - Bar titles defined as a custom attribute | custom_attribute | <part type="custom_attribute" data_value="title" value="translated Pane 2" /> |
| Collapsible Section - toggle button | caption custom_attribute | <translation_item action="replace" id="show_hide_details"> <part type="caption" value="translated Section Details"/> <part type="custom_attribute" data_value="showLabel" value="translated Show"/> <part type="custom_attribute" data_value="hideLabel" value="translated Hide"/> </translation_item> |
| Paragraph | paragraph |
<part type="paragraph"><p>Replacing some paragraph text including HTML embedded content.</p></part>
Note: The paragraph contains the HTML content of the rich text paragraph editor. |
| Repeats, e.g. Tables | repeat_no_data | <part type="repeat_no_data" value="translated No data available for display"/> |
| Display Variables with default values | display_variables | <translation_item action="replace" id="display_variables"> <part type="var1" value="translated Display Variable value"/> <part type="var2" value="translated Display Variable value"/> </translation_item> |
| Error Message Override | error_message | <part type="error_message" value="translated Error Display message"/> |
| Default Error Messages | default_error_messages |
<translation_item action="replace" id="default_error_messages">
<part type="1" value="translated Invalid Type"/>
<part type="2" value="translated This Field Is Required"/>
<part type="3" value="translated Missing number"/>
</translation_item>
See validationError.js for a complete listing of type values. |
| Placeholder Text | placeholder | <part type="placeholder" value="translated Placeholder Text"/> |
| Hints | hint |
<part type="hint" value="translated Hint Text"></part>
<part type="hint"><b>Replacing some hint text including HTML embedded content.</b></part>
Note: The second part in the above example allows for HTML content rather than just static translated text. |
| Menu Controls | select_option hint |
Use select_option part types to translate the displayed text for each menu item, in the same way as for select box/radio button controls. This will work for static menu options configured on the General Properties tab, as well as for more complex mult level menus created using the dynamic option.
In addition, you can add matching hint type part entries to translate any hint messages provided through the dynamic menu configuration structure. <translation_item id="menu" action="replace"> <part type="select_option" data_value="about" value="Translated About"/> <part type="select_option" dynamic_value="Products" value="Translated Products"/> <part type="hint" data_value="about" value="Translated About Hint Message"/> <part type="hint" dynamic_value="Products" value="Translated Products Hint Message"/> </translation_item> |
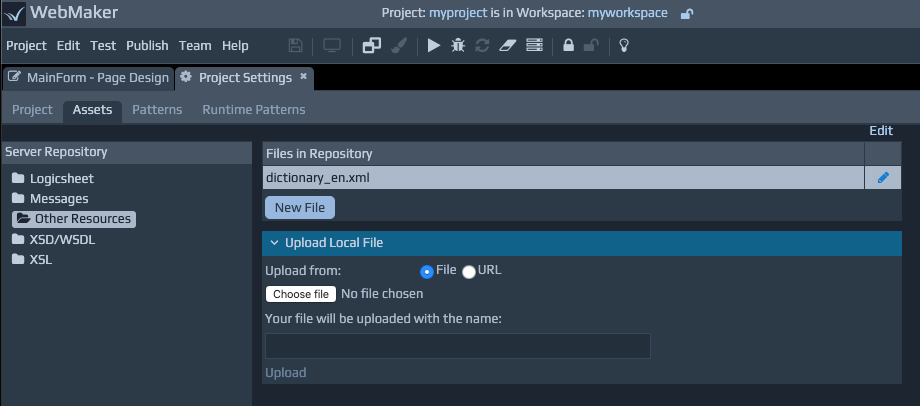 5. Once you have uploaded your files to the repository, you need to let the WebMaker Page Painter know that these files need to be used during runtime execution to translate your pages. To do this:
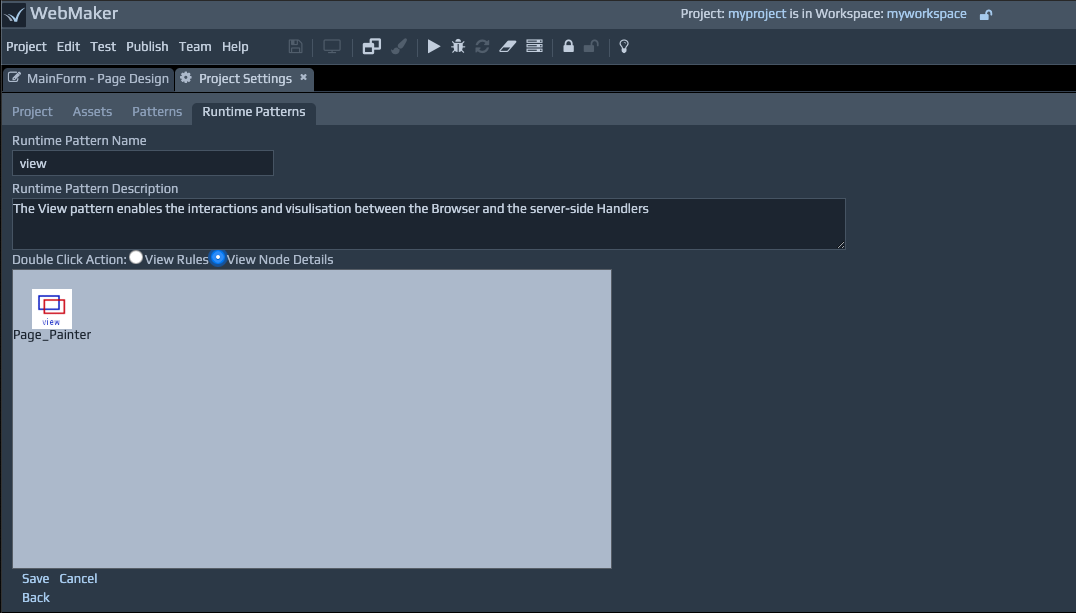
6. Click the views link within Runtime Patterns.
7. Now click the view link in the views list.
8. Select the View Node Details radio option for Double Click Action and then double-click on the Page_Painter view icon.
5. Once you have uploaded your files to the repository, you need to let the WebMaker Page Painter know that these files need to be used during runtime execution to translate your pages. To do this:
6. Click the views link within Runtime Patterns.
7. Now click the view link in the views list.
8. Select the View Node Details radio option for Double Click Action and then double-click on the Page_Painter view icon.
 Now click the View Engine & Resource Details link. You should see a screen as shown below.
9. Select the Other Resources of your project from the Available Resource Categories list under the Resource Details section.
Now click the View Engine & Resource Details link. You should see a screen as shown below.
9. Select the Other Resources of your project from the Available Resource Categories list under the Resource Details section.
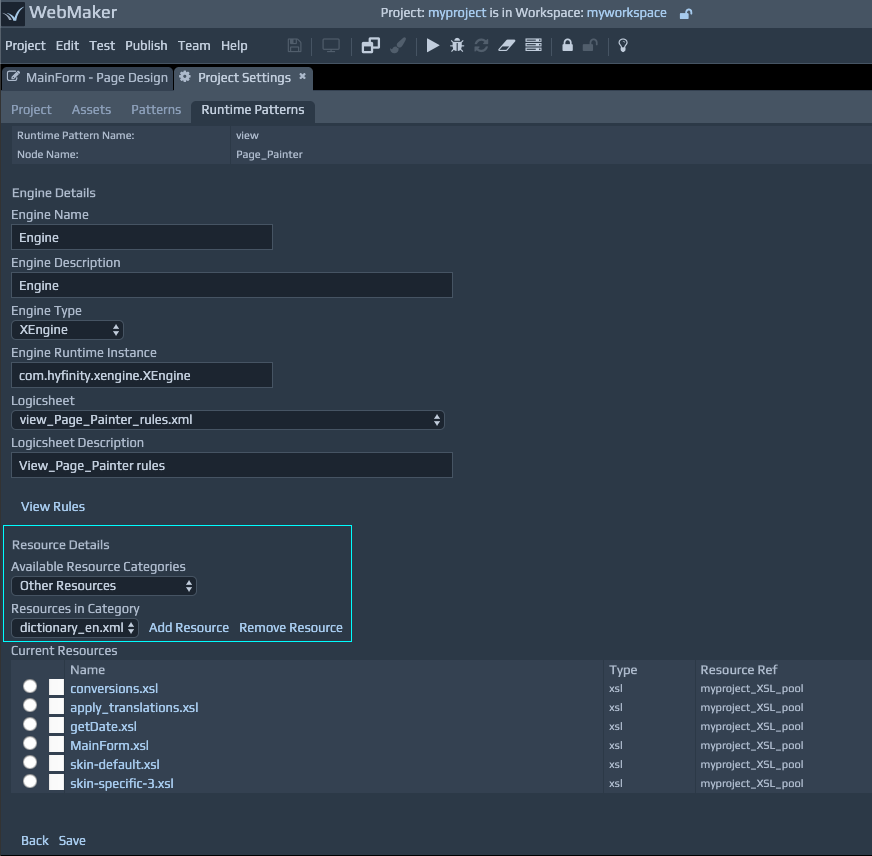 10. You should now be able to include your translation files from the Resources in Category dropdown. You should be able to select and add each of your files using the Add Resource button. As you add each file, they should appear under the Current Resources section.
11. When you have finished adding all your files, you can click Save.
You can test your translations using a parameterised approach (http://localhost:7080/Example/start.do?Language=en). You can also configure your application to automatically recognise the user's locale setting.
To enable the automatic option, you need to ensure the set_locale element is set to true in the xgate.xml configuration file. If you do not yet have this file in your project repository, then create a new
directory called doc under the existing webapp folder for your project, (e.g. [Install Location]/users/user[number]/[workspace]]/mvc/[project]]/webapp). You can now copy
the default xgate.xml file from the deployed project location (e.g. [Install Location]\runtime\tomcat-runtime\webapps\[project]\doc\xgate.xml) into this new directory. Copying this file to your repository makes sure that any changes you make to the file will be used for all future deploy and publish
operations.
You can verify your translations setup by using the Debugger. Simply check the Language
value in the Control block of the messages.
10. You should now be able to include your translation files from the Resources in Category dropdown. You should be able to select and add each of your files using the Add Resource button. As you add each file, they should appear under the Current Resources section.
11. When you have finished adding all your files, you can click Save.
You can test your translations using a parameterised approach (http://localhost:7080/Example/start.do?Language=en). You can also configure your application to automatically recognise the user's locale setting.
To enable the automatic option, you need to ensure the set_locale element is set to true in the xgate.xml configuration file. If you do not yet have this file in your project repository, then create a new
directory called doc under the existing webapp folder for your project, (e.g. [Install Location]/users/user[number]/[workspace]]/mvc/[project]]/webapp). You can now copy
the default xgate.xml file from the deployed project location (e.g. [Install Location]\runtime\tomcat-runtime\webapps\[project]\doc\xgate.xml) into this new directory. Copying this file to your repository makes sure that any changes you make to the file will be used for all future deploy and publish
operations.
You can verify your translations setup by using the Debugger. Simply check the Language
value in the Control block of the messages.